All records pertaining to ongoing or pending audits, lawsuits (or even reasonably anticipated lawsuits), or public record requests must not be destroyed, damaged, or altered until the issue is resolved and you are explicitly advised that such records may be destroyed.
Your duties under a destruction hold include the following:
A destruction hold will take precedence over the normal retention period of any/all responsive records. You cannot damage, alter, or destroy records that may contain information reasonably related to the identified subject matter until the issue has been resolved and all parties are notified. Labeling, organizing and segregating the records on hold is accepted best practice.
Once locating all records matching the scope of a destruction hold, you must preserve them until you have received final notification confirming the matter is resolved. Although the process is the same, it can be confusing handling electronic records instead of physical records. Not to fear, here are recommended best practices:
Putting an underscore, number, or symbol at the front of a folder name will move the folder to the top of the list so it’s clear and visible. Avoid adding other special characters (percent signs, commas, ampersands, asterisks) because they may be used in operating systems to perform certain tasks. Work with your IT group if you have questions. If you have multiple holds at once, you can title the folder based on the subject of the hold.
More information on file naming conventions here.

One option for folder placement is to create the new folder at the very top of your Inbox so that it’s clear and obvious. This way, the destruction hold folder and its contents won’t get deleted during any annual cleanout. Remember, emails subject to a destruction hold cannot be purged until the issue is resolved and you are explicitly advised that such records may be destroyed.
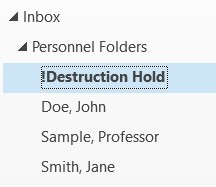
Alternatively, if you have an existing folder structure in your Outlook account and the scope of the destruction hold fits within your existing organizational scheme, you can do the same thing but place the new folder strategically within your existing folders. In this example to the right, if the destruction hold was regarding one specific employee, perhaps it would be logical to only have the destruction hold within the Personnel Folder section of your email account. Just be sure to not delete the parent folder or else your newly created Destruction Hold folder will be deleted along with it.
Be sure to search your entire mailbox, including sent, drafts, and deleted items that have not yet been permanently “double” deleted.

If using the desktop version of Outlook, be sure the search scope is set to Current Mailbox to capture all folders and subfolders.
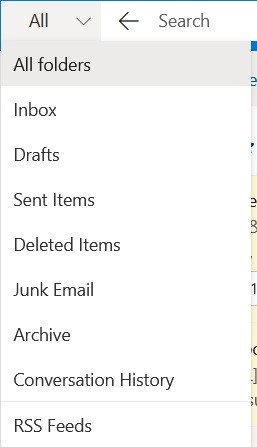
If using the web browser version of Outlook, be sure the change to search scope to All Folders in order to capture all folders and subfolders.
Search terms and timeframe will be dependent on the scope of the destruction hold. Contact your system support for assistance.
Once conducting the search for records related to the destruction hold, migrate them to the new outlook folder created for this purpose.
Copying search results is a great option if you have a detailed and existing folder structure system in Outlook. Although the act of copying emails would create duplicate versions, it will allow you to maintain your existing Outlook folder structure integrity while also allowing you to have all the emails on a Destruction Hold in one, centralized location. Once the destruction hold is lifted, you can then easily delete the entire destruction hold folder. The original version of those emails will exist in your other filing structure and will be retained for their normal retention period. Users must refrain from deleting any of the original version of these emails while the destruction hold is in place.
Copy all the search results to the newly created folder
Use the keyboard shortcut of holding Ctrl and clicking on multiple emails will select each email you click. Alternatively, if you are in a search window you can use the shortcut Ctrl + A to select all the emails in that search window.
Keyboard shortcut Ctrl + C to Copy and then Ctrl + V to Paste in the new folder.

Select all the emails you wish to copy -> Right click -> Move -> Copy to Folder… Select Newly Created Folder
Move all the search results to the newly created folder. In this case, the only version of that email record will be moved out of any existing folder structures and placed into the Destruction Hold folder.
Use the keyboard shortcut of holding the Ctrl button and clicking on multiple emails will select each email you click. Alternatively, if you are in a search window you can use the shortcut Ctrl + A to select all the emails in that search window.
Once selecting the emails, you can drag and drop the selected emails into the new folder.
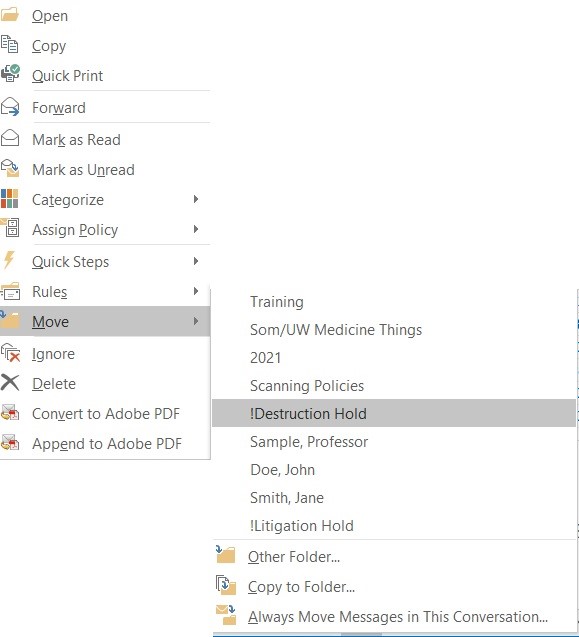
Alternatively, you can Right click after selecting the emails -> Move -> Select the newly created folder from the list of suggestions. If you don’t see the new folder as a one of the suggested, click on Other Folder… and choose the destruction hold folder.
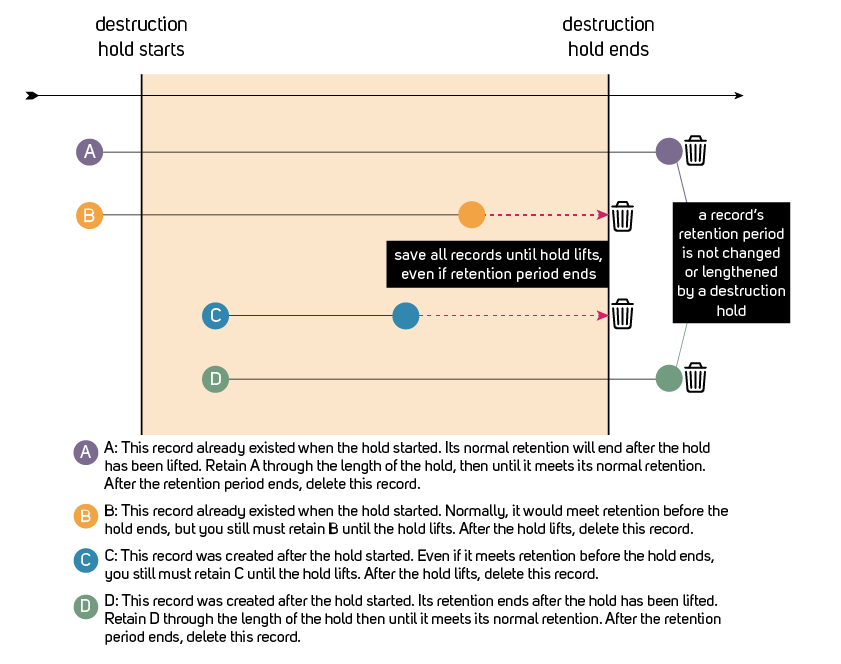
Be aware that by maintaining only one version of the emails, you must first wait for the destruction hold to be lifted via written approval. Then, upon receiving written notice the destruction hold has been lifted, you must evaluate the records based on their content and determine if the legal records retention has been met. If not, those records must be extracted from the destruction hold folder and maintained until their normal retention period has been met. Review the diagram at the bottom of this resource for scenarios.
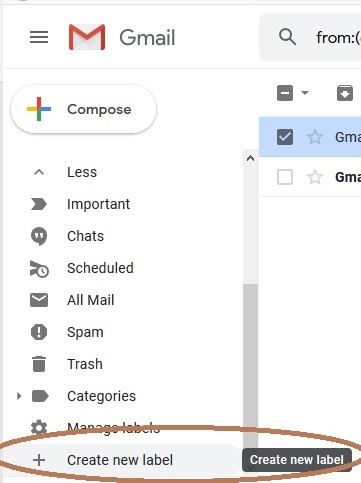
Email - GmailThe Create new label feature is found at the bottom of your mailbox folders on the left hand side of your screen. Click on + Create new label.
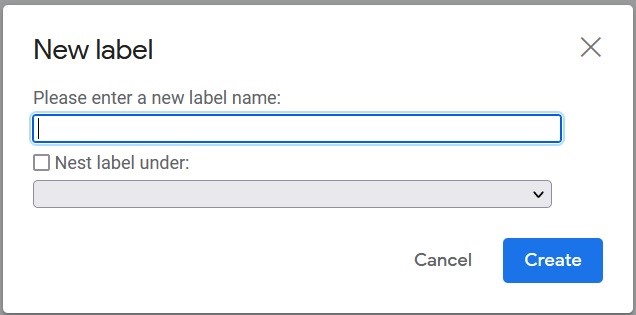
Putting an underscore, number, or symbol at the front of a label name will move the folder to the top of the list so it’s clear and visible. If you have multiple holds at once, you can title the folder based on the subject of the hold.
More information on file naming conventions here.
Once you are done creating a new label, search your entire mailbox for responsive records. Include your Sent, Drafts, and Trash. You can do this by ensuring that All Mail is selected when you expand the Search field in Gmail.
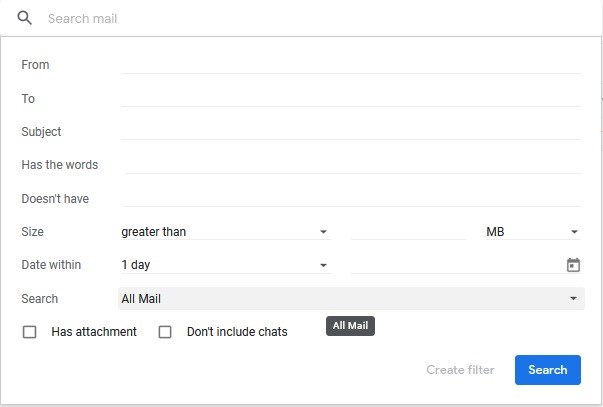
Search terms and timeframe will depend on the scope of the destruction hold. Contact your system support for assistance.
From the search results, click the Select Box on the left hand side and select All. This will select all the emails matching your search parameters.
![]()
With all the search results selected, click on the Label as: toolbar at the top right of the screen. And select the newly created destruction hold label.
In Gmail, the same email can have multiple labels attached to it. Therefore, before deleting any emails and applying normal retention practices ensure that no emails have a destruction hold label attached to them. Once the destruction hold is lifted, you can remove the hold label from the emails and apply normal retention.
Electronic Folders - Shared Drives, Google Drive, OneDrive, SharePoint
Putting an underscore, number, or symbol at the front of a folder name will move the folder to the top of the list so it’s clear and visible. Choose one system and stick to it.
If you have multiple holds at once impacting different types of records, you can title the folder based on the subject of the hold rather than just a generic hold title.
More information on file naming conventions here.
Search terms and timeframe will dependent on the scope of the destruction hold. Contact your system support for assistance.
Copying records found during the search process to the newly created folder will ensure that the records located remain within their existing folder structures.
Once the destruction hold is lifted, you can then easily just delete the entire destruction hold folder because the original version of those records will exist in your other filing structure. The copy of the records in the original filing structure will be retained for their normal retention period. Users must refrain from deleting any of the records in the original filing structure while the destruction is in place. All copies of responsive records must be retained during the length of the destruction hold. Even if the normal retention period has been met, if the destruction hold is still active, all copies must be retained. Review the diagram at the bottom of this resource for examples of these scenarios.
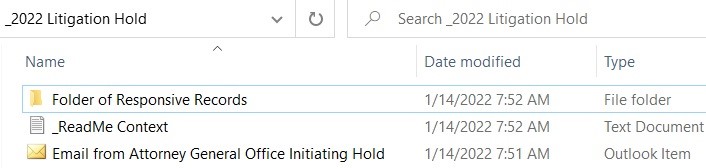
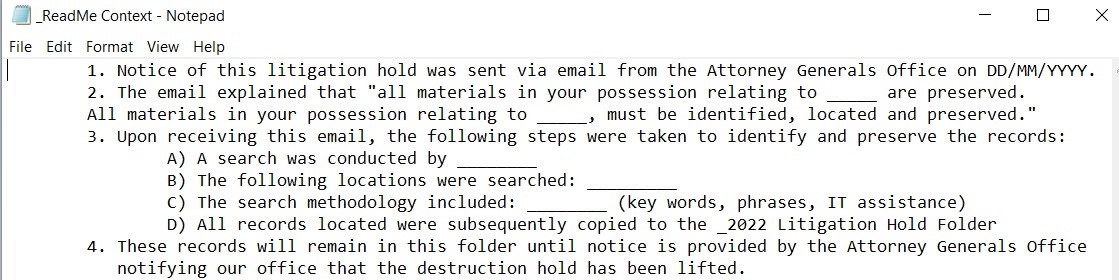
Adding a text document that explains who sent your office the destruction hold notice, when the destruction hold notice was received, what the scope of the hold was, and where/how the records were gathered will help inform colleagues or successors who access this centralized shared folder. Like the folder naming convention, use an underscore or number as the first character in the title of the text file to ensure the document remains at the top of the filing structure for easy access. A copy of the email and/or official destruction hold notification can be helpful as well.
Below is an example of what that might look like where the text document is titled _ReadMe Context
Depending on your workflow in SharePoint, rather than creating a new folder and copying responsive records to the new folder as described above, you can create a new column.
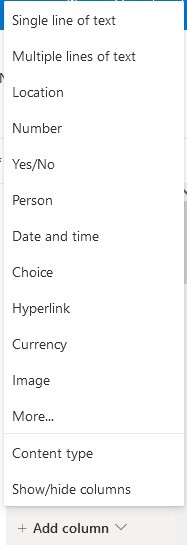
Navigate to the list or document library you want to create a new column in. To the right of the last column name at the top of the library, click on the + Add column v . Select: Yes/No
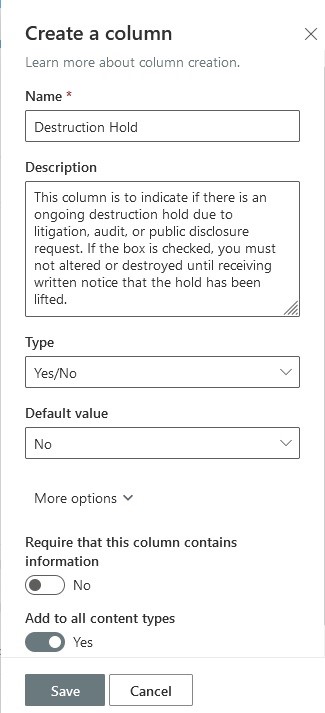
Name*: Destruction Hold
Description: This column is to indicate if there is an ongoing destruction hold due to litigation, audit, or public disclosure request. If the box is checked, you must not alter or destroy until receiving written notice that the hold has been lifted.
Type: Yes/No
Default Value: No
Require that this column contains information: No
Add to all content types: Yes
Click Save

You will notice on the right side that the Destruction Hold column has been added but remains blank.
Search terms and timeframe will dependent on the scope of the destruction hold. Contact your system support for assistance.
From the search results, click on the white circle in the toolbar to select all search results.


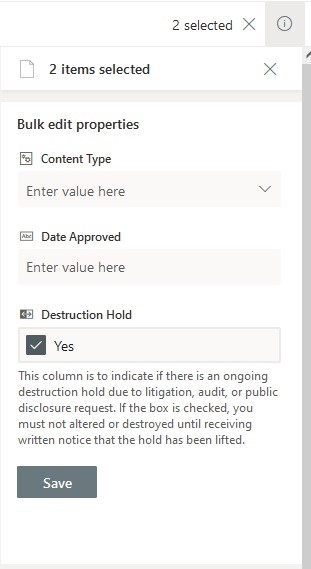

On the right side of the screen, a new popup will appear under the title Bulk edit properties. If it does not automatically appear, click on Open the details pane button that looks like this in the top right corner of your screen to open the popup window.
Under the Destruction Hold column check the box next to Yes.
Click Save
Now, the label will be applied to all previously selected materials.

This label will indicate to all users in that library that those records are on a destruction hold and should not be altered or deleted. Once receiving written notice that the destruction hold is lifted, go back and change the label from Yes to No using the same Bulk edit properties window.
Sometimes all it takes is a broad public record request, audit, investigation, or litigation to help you realize how disparate and complicated your existing filing system is. Use this opportunity to take steps for improvement.