This guide shows how to install, configure, and maintain a terminal server farm based on the Remote Desktop Services (RDS) role on Windows Server. The article will help you to deploy Remote Desktop Services on Windows Server 2022, 2019, or 2016 in an Active Directory domain.
The RDS role in Windows Server includes the following components:
In our small RDS deployment, there are only three Windows Server hosts with the following roles:
In the simplest case, you can deploy a standalone server with the Remote Desktop Session Host (RDSH) role without the Connection Broker and RDS Web Access.
Prerequisites to create an RDS farm:
Let’s see how to create and configure an RDS configuration using the Server Manager GUI.
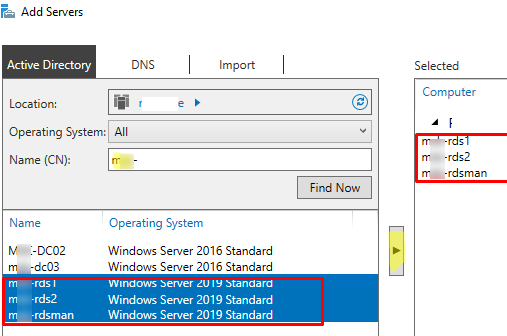
Open the Server Manager and add all RDS servers you want to the console. Click All Servers -> Add servers.

Click the Server Manager menu and select Add Roles and Features -> Remote Desktop Services installation -> Standard deployment –> Session-based deployment.
Quick Start mode is used to deploy all RDS roles on a single server. An RDS farm can have only one server running all RDS roles (RD Session Host, RD Web Access, and RD Connection broker). However, this configuration doesn’t provide fault-tolerance and workload balancing in Windows Server Remote Desktop Services.
Then specify which RDS roles you want to assign to your hosts. Select the servers for the corresponding roles in the RDS farm creation wizard. In my case, I want to build the following RDS configuration:
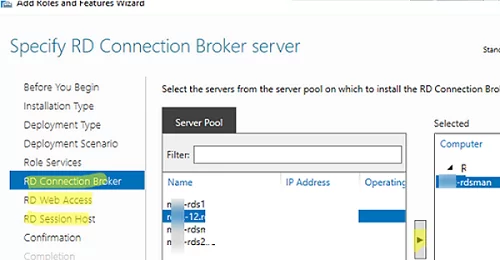
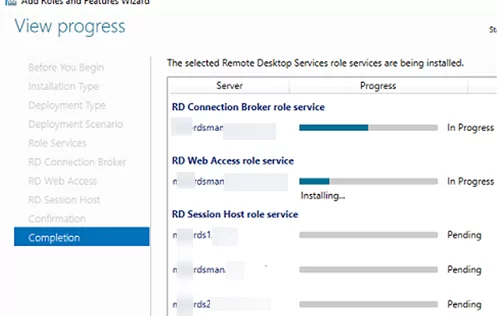
Check Restart destination server automatically if required and click Deploy. Wait until the RDS roles are installed on all servers.
So, your RDS farm is created.
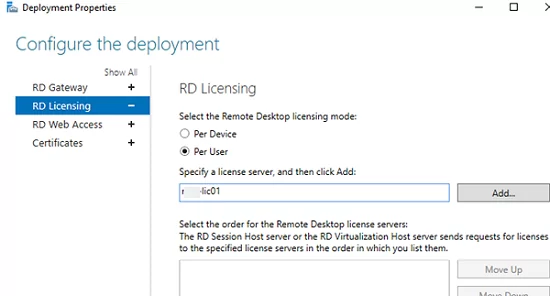
The next step is to install and configure the RDS licensing server. You can install the RD Licensing role on one of the servers on your farm or use an existing RDS licensing server in your domain. Check the detailed guide on how to install, configure and activate the RD Licensing role.
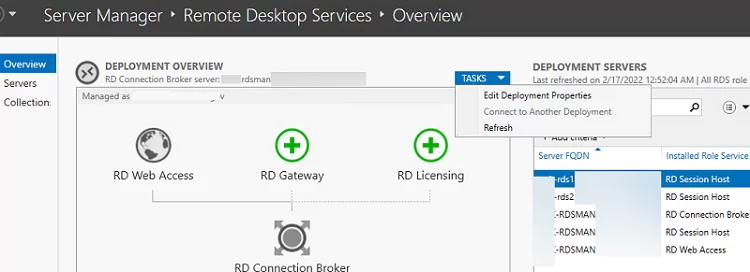
To manage your RDS deployment, open Server Manager -> Remote Desktop Services. The current RDS farm configuration is displayed on the Overview tab.
To change the RDS farm settings, select Tasks -> Edit Deployment Properties in the Deployment Overview section.
Here you can change:
You can manage the farm through the RDCB host. The RDS farm configuration is stored in the SQL Server database. If you want, you can manually move the RDS Connection Broker role and configuration to another server.
To build a fault-tolerant Remote Desktop Services farm, you have to provide high availability for the RD Connection Broker role. This is achieved by running multiple RDCB instances (Active/Active) on different servers with a shared SQL Server database that stores the connection broker configuration. You can use the SQL Server Always On high-availability group to make the RDCB SQL database high available. Earlier we published a detailed guide on how to configure a highly available RDS Connection Broker.
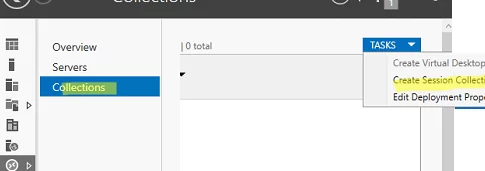
The next step is to create collections of RDS sessions. Remote Desktop collections allow to split hosts in an RDS farm into separate groups or create different sets of settings and available Remote Apps for different groups of users.
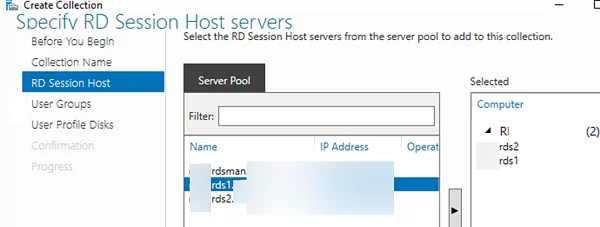
Go to Collections and select Edit -> Create Session Collection.
Here you need to:
To configure RDS collection settings, select the collection and click Tasks -> Edit Properties.
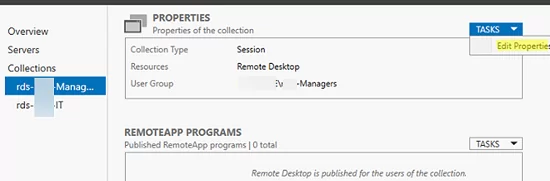
Here you can change basic collection options (name, description, access groups), and some other settings.
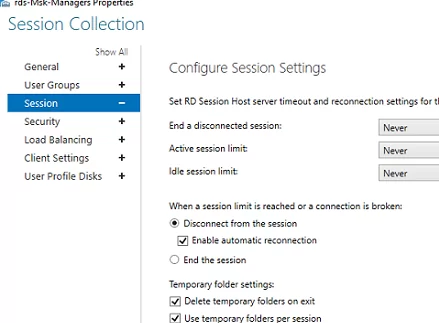
On the Session tab, you may configure reconnection/automatic disconnection options for inactive (idle) RDP sessions (learn more How to Configure Timeouts for RDP Sessions).
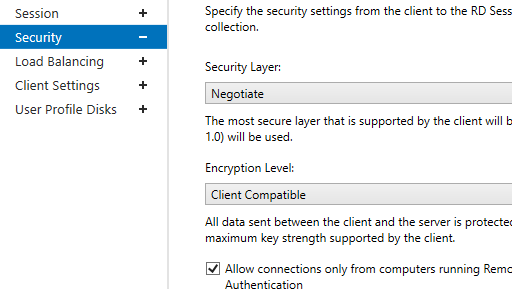
In the Security tab, you may select security (Negotiate, RDP Security level, or SSL/TLS) and encryption (Low, High, Client compatible, or FIPS compliant) settings for RDP sessions. Here you can enable/disable Network Level Authentication (NLA) for RDP.
In the Load Balancing tab, you may change RDS host Relative Weight in your farm. If server characteristics (RAM, CPU) in a collection are very different, you need to set a lower weight for the hosts with lower performance. After that, RDCB will distribute user sessions among RDS hosts depending on their weight.

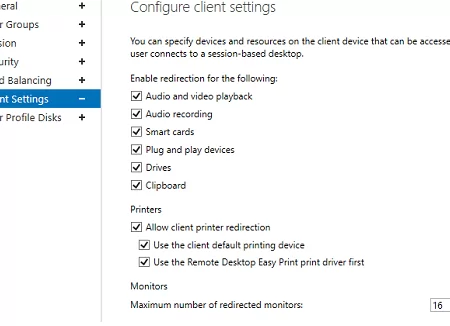
The Client Settings tab allows you to specify which local devices users are allowed to redirect to their RDP sessions. For example, you may enable or disable the redirection of printers, drives, audio devices, or the clipboard from a local user computer to the RDS session.
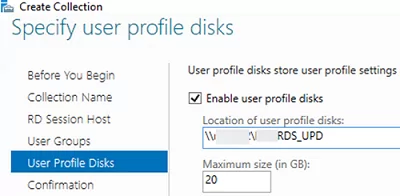
In the User Profile Disks tab, you may fine-tune UPD settings. You may exclude certain folders or files from sync. It allows to reduce the UPD profile size in a shared network folder and makes a profile load faster (remember that it is loaded over the network from the shared folder when a user logs on).
It is easier to configure and use UPD than roaming profiles or folder redirection. You cannot use the same UPD profile in more than one RDS collection.
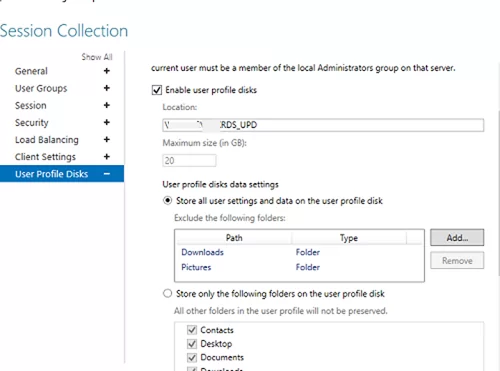
To reduce the size of a user UPD disk, you can use the built-in PowerShell cmdlet Resize-VHD , which is used to resize Hyper-V virtual VHDX disks.
You can put any RDSH server into maintenance mode (RDS Drain Mode) through the HOST SERVERS section of the RDS collection. To do it, click a server and select Do not allow new connection. Then the Connection Broker will not send new user sessions to the RD host. In this mode, you can install Windows updates or update apps on the server without affecting the users.

Here you can also add/remove an RDS host from a collection.
If the RD Session Host server fails, you can properly remove it from your Remote Desktop Services deployment by following this guide.
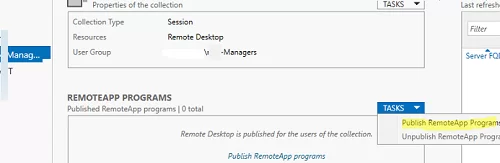
RemoteApps are programs published for users on RDS servers. Thanks to RemoteApps, you may use apps installed on a terminal RDSH server as if they are running on a local user computer. The user doesn’t see the entire Windows Server RDS desktop and works only with those apps an administrator has published for them. Only the window of the program running on RDS will be displayed on the user’s computer.
If you don’t create RemoteApps, users will work directly on the Windows Server desktop. So remember to copy the app shortcuts a user may need to C:\Users\Public\Desktop. Files from this folder will be displayed on the desktops of all users. If you want to install an MS Office 365 on your RDSH, note that Office must be deployed in the SharedComputerLicensing mode.
RemoteApps are created in the RDS collection settings. Select Tasks -> Publish RemoteApp Programs in the REMOTEAPP PROGRAMS section.
Windows will list all apps installed on the current RD host. You may select one of them. If there is no app you need in the list, but it is installed on other RDS hosts, click Add and specify the full path to the application’s executable (exe, bat, cmd, etc.).
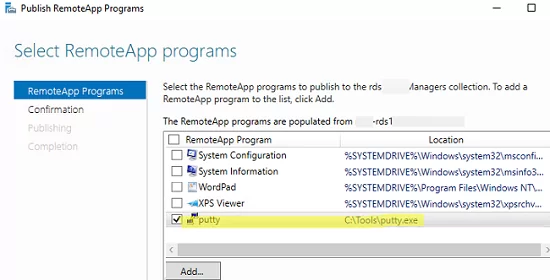
Publish the RemoteApp.
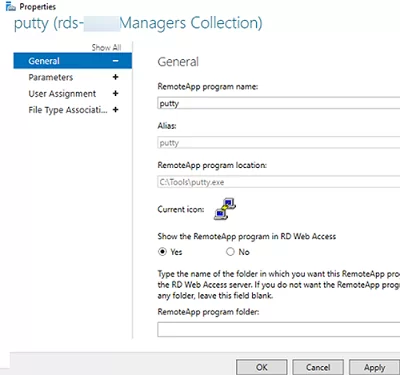
Then you can specify additional app options in the RemoteApp settings.
 properties in rds collection settings" width="" />
If you want to change an icon of the published RemoteApp, open the following folder on the server with the RDS Connection Broker role:
![]()
Replace the app icon with another ICO file.
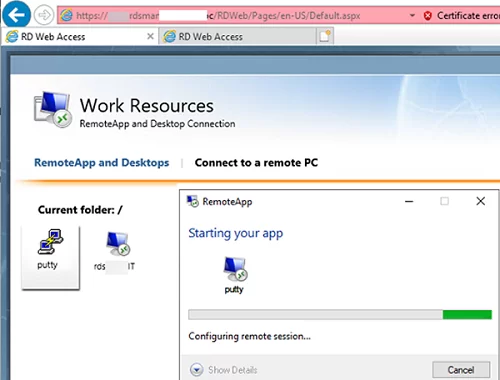
Then a user can run a RemoteApp program from RD Web Access ( https://mun-rdsman.woshub.com/RDWeb ) or using a special *.RDP file.
To run a published RemoteApp program, you need to add the following lines to the RDP file:
remoteapplicationmode:i:1 remoteapplicationname:s:putty remoteapplicationprogram:s:"C:\Tools\putty.exe" disableremoteappcapscheck:i:1 alternate shell:s:rdpinit.exe
Some useful tips to use your RDS farm conveniently:
If you clearly see the structure of an RDS farm, you can quickly deploy your RDS configuration using PowerShell.
It is better to run the following PowerShell commands to create an RDS farm on another server since you will have to restart managed RDS hosts.
Set the server names in your RDS farm. In this example, I will install the RDCB and RDS licensing roles on separate servers (later it is recommended to enable a highly available RDCB configuration).
$RDSH1 = "mun-rds1.woshub.com"
$RDSH2 = "mun-rds2.woshub.com"
$RDSCB = "mun-rdcb.woshub.com"
$RDSGW = "mun-rdsgw.woshub.com"
Import-Module RemoteDesktop
Install RDS roles on the servers:
Add-WindowsFeature –ComputerName $RDSH1, $RDSH2 -Name RDS-RD-Server –IncludeManagementTools
Add-WindowsFeature –ComputerName $RDSCB -Name RDS-Connection-Broker -IncludeManagementTools
Add-WindowsFeature –ComputerName $RDSGW -Name RDS-Web-Access, RDS-Gateway –IncludeManagementTools
Restart all hosts:
Restart-Computer -ComputerName $RDSH1,$RDSH2,$RDSCB,$RDSGW
Create a new RDSessionDeployment instance:
New-RDSessionDeployment -ConnectionBroker $RDSCB -SessionHost $RDSH1,$RDSH2 –Verbose
Add RDWA and RDGW servers to your farm:
Add-RDServer -Server $RDSGW -Role RDS-WEB-ACCESS -ConnectionBroker $RDSCB
Add-RDServer -Server $RDSGW -Role RDS-GATEWAY -ConnectionBroker $RDSCB -GatewayExternalFqdn "rds.woshub.com"
You can list the RDS roles and hostnames in your farm:
Get-RDServer -ConnectionBroker $RDSGW
Add-WindowsFeature –ComputerName $RDSCB -Name RDS-Licensing, RDS-Licensing-UI
Set a PerUser RDS licensing mode:
Add a licensing server to a domain security group:
Add-ADGroupMember "Terminal Server License Servers" -Members "mun-rdcb$"
If you have a certificate for the RDS, you can add it to your farm configuration (you may use the free Let’s Encrypt SSL certificate for your RDS host):
$Path = "C:\ps\RDSCert.pfx"
$Password = ConvertTo-SecureString -String "setCertificPAssw00rd11-" -AsPlainText -Force
Set-RDCertificate -Role RDGateway -ImportPath $Path -Password $Password -ConnectionBroker $RDSCB -Force
Set-RDCertificate -Role RDWebAccess -ImportPath $Path -Password $Password -ConnectionBroker $RDSCB -Force
Set-RDCertificate -Role RDPublishing -ImportPath $Path -Password $Password -ConnectionBroker $RDSCB -Force
Set-RDCertificate -Role RDRedirector -ImportPath $Path -Password $Password -ConnectionBroker $RDSCB -Force
To get information about the installed SSL certificates:
Then you can create RDS collections:
$CollectionName = "ITdept"
New-RDSessionCollection –CollectionName $CollectionName –SessionHost $RDSH1,$RDSH2 –ConnectionBroker $RDSCB –CollectionDescription “IT department management collection”
To allow access to RDS servers for groups:
$UserGroup =@("WOSHUB\mun-admins","WOSHUB\mun-devops")
Set-RDSessionCollectionConfiguration -CollectionName $CollectionName -UserGroup $UserGroup
To publish a RemoteApp program:
New-RDRemoteapp -Alias GoogleChrome -DisplayName GoogleChrome -FilePath "C:\Program Files (x86)\Google\Chrome\Application\chrome.exe" -ShowInWebAccess 1 -CollectionName $CollectionName -ConnectionBroker $RDSCB
In this article, we covered how to install and configure a Remote Desktop Services farm on Windows Server 2019/2022 using the Server Manager graphical interface and PowerShell. The RD Web Access and RD Gateway roles are not described here. We’ll show how to configure these roles in future articles.